Your Complete RV Preparation and Performance Checklist
- Aug 7, 2018
| Whether you’re planning a short weekend trip to your local national park—or an extended cross-country road trip—you can help avoid unexpected roadside headaches by performing thorough pre-trip maintenance on your RV. Taking good care of your home-away-from-home will help you enjoy your vacations for many years to come!
CHECK YOUR BRAKESCheck for any brake fluid leaks, and make sure the reservoir is filled to the recommended level. If you’re towing a heavy load, your brakes have to work even harder, particularly on steep inclines. When looking between your wheel’s spokes, you should be able to see at least one-fourth of an inch of pad—any thinner than that, and you should have them inspected and possibly replaced. EXAMINE YOUR TIRESYour tire treads should be in good condition before any trip—generally speaking, less than 6/32” of tread depth indicates that your tires should be replaced, as well as any cracks that are deeper than 1/16”. To extend the life of your tires, check to make sure your tire pressure is always at the manufacturer-recommended level, and rotate your tires regularly according to their recommended service schedule. Long periods of storage and long-term exposure to sunlight can accelerate tire damage.
INSPECT YOUR COOLING SYSTEMOverheating on the open road in the middle of summer isn’t just a temporary headache—it can cause permanent engine damage. While your engine is cool, take a close look in your engine bay. Cracks or leaks in hoses and belts indicate a need for immediate repair, and make sure all connections are snugly fitted. Fill your coolant reservoir to the recommended level (a 50/50 mixture of coolant and distilled water is standard). If it’s been more than two years since your last full coolant flush, you should consider completely replacing the fluids. CONSIDER A BACKUP CAMERAA backup camera helps take the guess-work out of navigating tight spaces and hitching up trailers—and also increases safety. Even the most seasoned drivers can benefit from an extra pair of eyes in their blind spots.
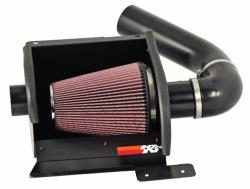
INSTALL AN AIR INTAKE SYSTEMIf you’re nervous about getting up steep inclines—or need a little extra pep for towing—installing a K&N performance air intake system will provide you with a guaranteed increase in horsepower and torque. The 77-2570KTK intake system—designed for 2015-2016 Ford E450 6.8L V10 motorhomes—provides an estimated increase of 17.46-horsepower at 4,101 RPMs*. Find yours at knfilters.com!
“I installed this intake on my 2011 E350 Super Duty van one week before a 10,000-mile road trip around the US. Can’t say enough good things about this system. Great power right out of the box. Sounds amazing and helped with fuel mileage. Was a must have for the mountains out West.” – Brandon from Florida REFRESH YOUR TOOL KITMake sure your tool kit is properly stocked, and that all of your tools are in working order. It’s a good idea to carry:• Cordless drill and spare battery • Small drill bit set • Screws and an assortment of small hardware • Small bolts/washers of various sizes and lengths • Flashlight and/or headlamp • Folding shovel • Caulking gun/caulk • Road flares • Distilled water • Jumper cables • Socket wrench set • Phillips head and flat-blade screwdrivers • Pliers (standard and channel-lock) • Hammer • Pocket knife • Wire cutters • Tape measure • Hacksaw • Super glue • Insulated wire • Electrical tape • Fuses of various amperages • Replacement bulbs • Duct tape TEST ALL EXTERIOR AND INTERIOR LIGHTSMake sure all of your lights are in proper working order before heading out on any trip, and keep a package of replacement bulbs as part of your kit.
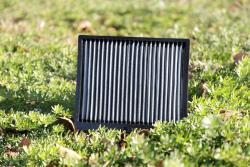
CHANGE YOUR ENGINE/CABIN AIR FILTERSA clogged filter decreases airflow to your engine and can reduce performance when you need it most. Check out K&N’s High-Flow™ Air Filters—they’re washable, reusable, and designed to last for the entire lifespan of your RV. If you have a cabin air filter, check out K&N’s washable line, which helps protect your cabin and passengers from airborne dust and contaminants. To search for filters for your specific vehicle, check out knfilters.com. CHECK YOUR FULL ELECTRICAL SYSTEMExamine the electrical cord that connects your RV to a park power source, and check for any signs of damage. Also, take a look at your circuit breakers and fuse boxes, and make sure they’re labeled. If you’re towing, make sure the electrical connection is set up properly. ANALYZE YOUR BATTERIESBatteries can lose a considerable amount of charge while in storage, so make sure your batteries are fully charged before any trip—and watch out for any corrosion. Always refer to the manual when adjusting water levels, and be sure to wear eye protection. FLUSH YOUR WATER SYSTEM + CHECK FOR LEAKSIt’s a good idea to sanitize your water system every time you take your RV out of storage. Can you imagine what grows in a moist water system that’s left to sit in storage for months? You probably don’t want to. Bacteria, mildew, and mold can proliferate in a water system that’s left to sit—and you want the water you bathe in, cook with, and drink to be clean. Steps to sanitize your water system:• Drain the water heater (never drain while hot or under pressure) • Locate and drain the water from the low point water line drains—one for hot and one for cold water lines • Drain the fresh water holding tank • Close all of the drains • Use ¼ cup of bleach for every 15 gallons of water your tank holds—mix the bleach with water in a 1-gallon container and pour into the water holding tank (do not pour straight bleach into your tank!) • Fill the fresh water holding tank almost full of potable water • Turn the water pump on, and open all faucets • Run all of the faucets until you smell bleach at each faucet • Close the faucets • Let sit for around 4 hours • Drain the entire system again—re-fill fresh water tank with potable water • Run all faucets until you no longer smell bleach (you may have to drain the system multiple times to remove all bleach from the system) • Once you no longer smell bleach at each faucet, your water system is now clean! You can check for leaks by grabbing a flashlight or headlamp and turning on your water pump. Wait until the sound of the pump stops and the water is pressurized. Turn off the pump, and begin looking for leaks—around the toilet and under the sink are good places to start. TEST APPLIANCESCheck each interior appliance to make sure it is in good working order. Test your water pump, furnace, air conditioner, and all lights and outlets. If you use propane (LP gas), check your tanks (these can expire), all connections, the valve, and the firing operation. If something seems off, have a professional examine the system. SERVICE YOUR GENERATORWhen pulling your RV out of storage for the season, follow the directions for servicing in your generator’s manual. Before starting it up, make sure the oil is at the appropriate level, and check for any problems around the exhaust. Run the generator for at least two to three hours every month to keep it primed and ready, as fuel that sits too long can cause damage.
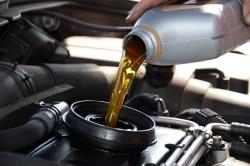
CHECK ALL FLUIDSCheck the levels of your transmission fluid, power steering fluid, engine coolant, engine oil, windshield washer fluid, brake fluid, and generator oil. If any fluids are suspiciously low, make sure to check for leaks. Regular oil changes help prevent unnecessary wear-and-tear on your engine. INSPECT SEAMSAt some point in your RV’s lifespan, it will probably experience a leak or two in its roof seals and/or seams. It’s important to know the type of material that your RV’s roof features, and bring along compatible repair sealants on every trip just in case. Sealants will vary based on the RV’s material—silicone, for example, won’t bond with a rubber roof. Regular household caulking may or may not hold up long-term, but can work to plug a leak in a pinch. Water damage can be seriously expensive, so plan ahead for on-the-go repairs. With a bit of forethought and careful maintenance, you can help avoid mid-trip repair fiascos, increase your RV’s performance, and enjoy well-planned vacations for years to come! Search for performance products for your RV at knfilters.com.*Estimated horsepower and torque gains based on specific or similar vehicle dynamometer tests. Results will vary. For more information, look up vehicle and/or testing protocols at knfilters.com. This post is for informational purposes only, and we do not warrant that the information provided will produce any specific results or achieve any intended purposes. Every vehicle is different and subject to different road conditions and wear and tear. You should always follow your manufacturer’s recommended service schedule, consult the vehicle owner’s manual, and/or have your vehicle evaluated by a properly trained mechanic. |

